Get Started

Integrating the Pieces MCP with Cursor is a powerful and efficient way to bring your daily workflow context directly into your IDE.

With this integration, you'll have an in-IDE chatbot that knows more about your project than just the active file or project folder.

You can ask questions about additional workflow information, like whether a coworker fixed a bug in last week's PR, and then use that solution to fix a similar error in your code without having to look through old chat logs or GitHub commits.

Learn how to integrate the Pieces MCP into Cursor by following the steps below.

It is imperative that you download and/or update your version of Cursor to the **latest, most up-to-date version** to ensure compatibility with Pieces MCP.

Prerequisites

There are [2] primary prerequisites for integrating Pieces with Cursor as an MCP—an active instance of PiecesOS and the fully-enabled Long-Term Memory engine.

Make sure that PiecesOS is installed and running. This is *required* for the MCP server to communicate with your personal repository of workflow data and pass context through to the Cursor chat agent.
If you do not have PiecesOS, you can download it alongside the [Pieces Desktop App](/products/desktop/download) or [install it standalone](/products/core-dependencies/pieces-os/manual-installation#manual-download--installation) here.
For the MCP server to interact with your workflow context, you must enable the Long-Term Memory Engine (LTM-2.7) through the Pieces Desktop App or the [PiecesOS Quick Menu](/products/core-dependencies/pieces-os/quick-menu) in your toolbar.

Installing PiecesOS & Configuring Permissions

Follow the instructions below for a detailed guide on setting up and configuring PiecesOS to correctly pass captured workflow context to the Pieces MCP server.

Getting the SSE Endpoint for PiecesOS

To use Pieces MCP with Cursor, you'll first need the Server-Sent Events (SSE) endpoint from PiecesOS:

http://localhost:39300/model_context_protocol/2024-11-05/sse
Keep in mind that the **specific port** (i.e., `39300`) PiecesOS is running on **may vary**.

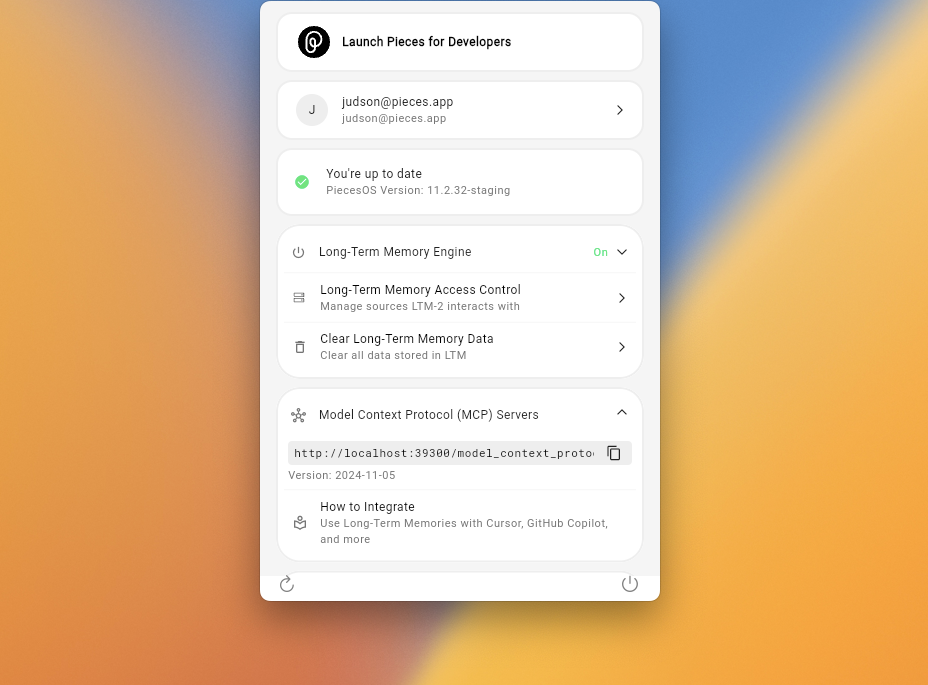
To find the current SSE endpoint with the active instance of POS (including the current port number), open the PiecesOS Quick Menu and expand the Model Context Protocol (MCP) Servers tab.

There, you can click once to copy the SSE endpoint, which includes the active PiecesOS port number.
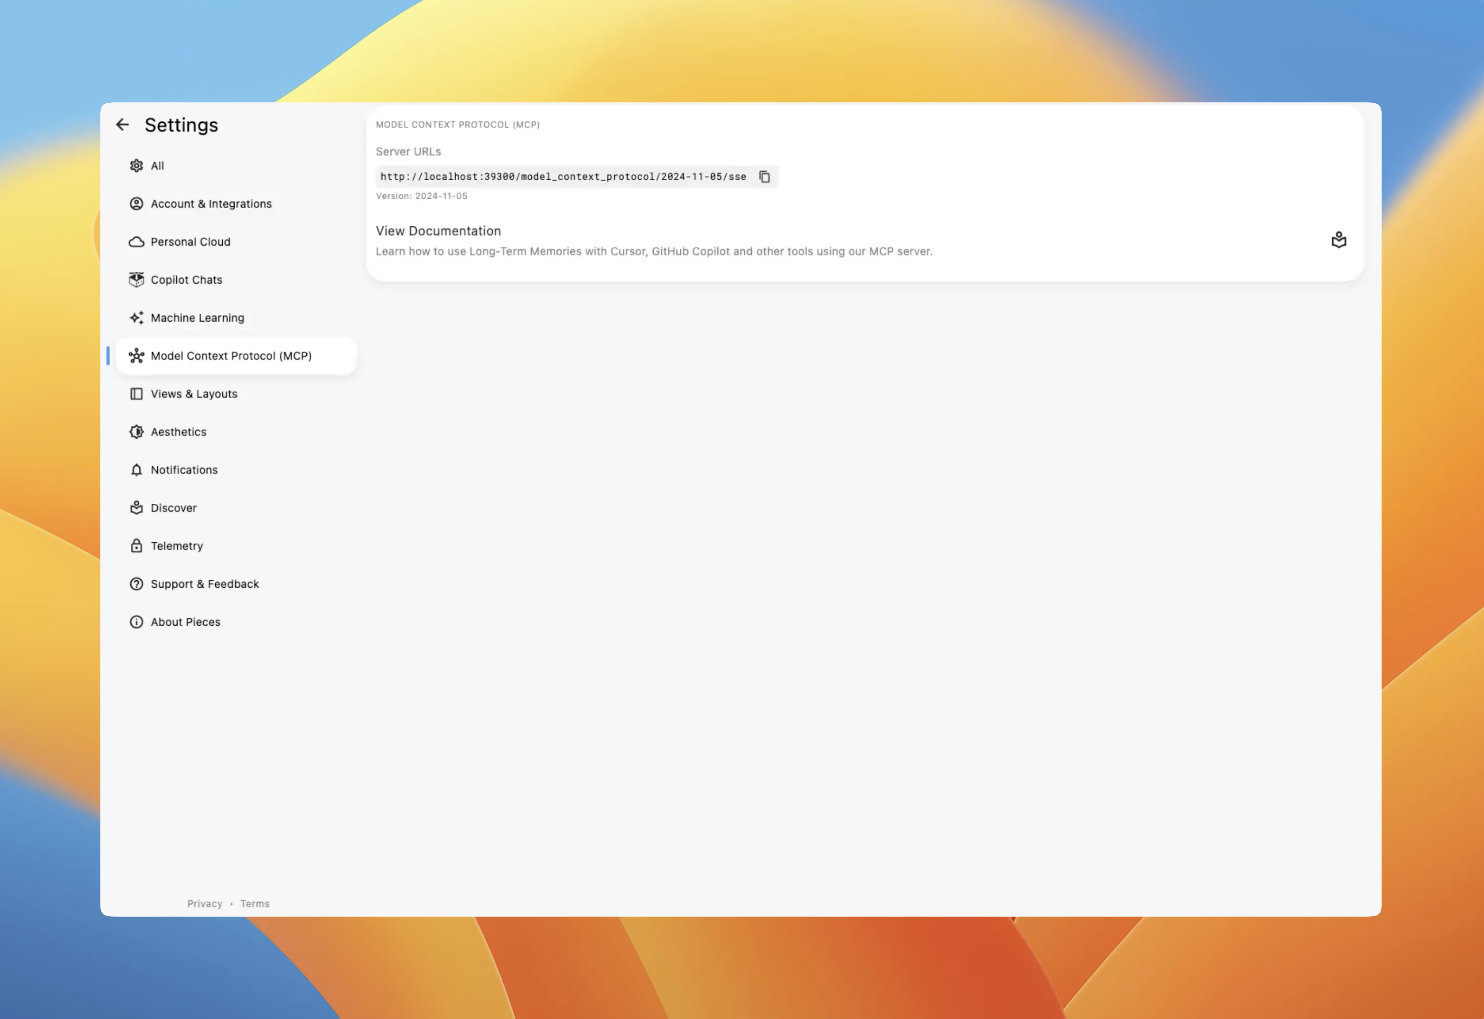
You can also do this in the Pieces Desktop App by opening the Settings view and clicking Model Context Protocol (MCP).
Setting Up Cursor

Read below for steps on setting up the Pieces MCP in your Cursor IDE using the global MCP configuration method—or watch the video below for a tutorial and live demo.

via Global MCP Configuration

To set up the Pieces MCP, you can edit the .json settings configuration file from within Cursor Settings.

Navigate to **Cursor Settings**, then to the `MCP` section.
<Image src="https://storage.googleapis.com/hashnode_product_documentation_assets/mcp_documentation/mcp_cursor/cursor_no_mcp.png" alt="" align="center" fullwidth="true" />
Add a new global MCP server by clicking `Add new global MCP server` and inserting the following `.json` snippet (adjust port if necessary) in the `.json` file that opens:
```json
{
  "mcpServers": {
    "Pieces": {
      "url": "http://localhost:39300/model_context_protocol/2024-11-05/sse"
    }
  }
}
```
Save the configuration file.
Make sure to refresh the MCP server window by clicking the **refresh icon** and ensure that there is a *green dot* indicating that the server is running and functioning without errors.

<Image src="https://storage.googleapis.com/hashnode_product_documentation_assets/mcp_documentation/mcp_cursor/cursor_green_dot_mcp.png" alt="" align="center" fullwidth="true" />
Once the MCP server is set up, make sure to change the chat mode to *Agent* mode. This should automatically utilize the `ask_pieces_ltm` tool.

Using Pieces MCP Server in Cursor

Once integrated, you can utilize Pieces LTM directly in Cursor through the built-in chat agent.

Open the right-hand chat panel by toggling it at the top-right corner, or use the shortcut `⌘+i` (macOS) or `ctrl+i` (Windows/Linux). Make sure that you're using the *Cursor Agent* mode, not *Ask* or *Manual.* This is required to use the `ask_pieces_ltm` tool to access context from LTM. From this point, you can begin prompting. If PiecesOS was previously installed, try testing out the Pieces MCP integration with a prompt like, “What was I doing for work yesterday?” and click `Use Tool` when prompted.
<Image src="https://storage.googleapis.com/hashnode_product_documentation_assets/mcp_documentation/mcp_cursor/example_pieces_mcp_cursor.gif" alt="" align="center" fullwidth="true" />
Check out this [MCP-specific prompting guide](/products/mcp/prompting) if you want to effectively utilize the Long-Term Memory Engine (LTM-2.7) with your new Pieces MCP server.

Configuring Rules

If you want to customize the specific output provided by the Cursor chatbot through working with the ask_pieces_ltm tool, you can manually adjust the rules for inside of Cursor Settings.

To do this, open up Cursor Settings, click Rules, then add new User Rules.

Here’s an example of a straightforward set of rules tailored to a specific use case and work flow:

Troubleshooting

If you’re experiencing issues integrating Pieces MCP with Cursor, follow these troubleshooting steps:

  1. Verify PiecesOS Status: Ensure PiecesOS is actively running on your system. MCP integration requires PiecesOS to be operational.

  2. Confirm LTM Engine Activation: Make sure the Long-Term Memory Engine (LTM-2.7) is enabled in PiecesOS, as this engine aggregates context necessary for Cursor to retrieve accurate results.

  3. Single MCP Instance: Make sure that you aren’t testing multiple instances of the Pieces MCP server in different IDEs. This cross-contamination conflict with the SSE and several MCP instances running on the same port can cause issues in different development environments.

  4. Use Agent Mode in Chat: Cursor must be in Agent Mode, not Ask Mode, to access the ask_pieces_ltm tool. Switch to Agent Mode to enable full MCP integration.

  5. Turn Off Auto-Select: If Cursor is having issues finding the Pieces tool, de-select auto-select and select an individual Agent, such as claude-3.5-sonnet.

  6. Check MCP Server Status: If you’re encountering messages such as “Sorry, I can’t do this,” your MCP server may not be properly configured or running.

  7. Go to settings.json in Cursor: Confirm the MCP server status shows "running" (it may say "start" or "pause" otherwise). Restart the server if necessary and inspect terminal outputs for error messages.

  8. Review Configuration Details: Double-check the MCP endpoint URL and the port number in Cursor settings to ensure accuracy, You can find the current SSE endpoint URL in the Pieces Desktop App under SettingsModel Context Protocol (MCP), or in the PiecesOS Quick Menu. It is usually formatted as:

http://localhost:{port_number}/model_context_protocol/{version}/sse

JSON Blob Error in MCP Settings

When you open Preferences → Settings → MCP, you may see a raw .JSON payload or “unknown message ID” error displayed beneath your enabled Pieces server—even though your tool calls work correctly.

Cursor’s Settings UI currently doesn’t recognize the JSON-RPC success envelope, so it misclassifies the response as an error object and dumps the payload.

This visual artifact is harmless. All genuine LTM responses still arrive properly in the Cursor chat window.

Ignore any red `.JSON` blobs in the MCP Settings view. The **Chat** pane is the source of truth—if your pieces queries return formatted summaries there, the integration is functioning normally.

You’re now set to enhance your workflow with powerful context retrieval through Pieces MCP integrated seamlessly into Cursor. Happy coding!