Pieces MCP + Goose | Setup Guide
Discover how to integrate Pieces Model Context Protocol (MCP) with Goose. Access Long-Term Memory in the Goose CLI for enhanced, context-aware productivity.
Get Started
Integrating the Pieces MCP with Goose is a powerful way to bring your daily workflow context directly into your command line or desktop interface.
With this integration, you'll have a command-line AI assistant that knows more about your coding activities than just the current project.
You can ask Pieces about bug fixes in your code discussed in your team channel, inquire about similar code you've worked on, or prompt it to double-check that your new code meets the criteria your coworker suggested—and much more.
Learn how to integrate the Pieces MCP into Goose by following the steps below.
Prerequisites
There are [2] primary prerequisites for integrating Pieces with Goose as an MCP—an active instance of PiecesOS and the fully-enabled Long-Term Memory (LTM-2.7) engine.
Installing PiecesOS & Configuring Permissions
Follow the detailed set-up instructions below for a detailed guide on setting up and configuring PiecesOS to correctly pass captured workflow context to the Pieces MCP server.
SSE Endpoint
To use Pieces MCP with Goose, you'll need the Server-Sent Events (SSE) endpoint from PiecesOS:
http://localhost:39300/model_context_protocol/2024-11-05/sse
To find the up-to-date SSE endpoint with the active instance of POS (including the current port number), open the PiecesOS Quick Menu and expand the Model Context Protocol (MCP) Servers tab.
There, you can copy the SSE endpoint with one click, which includes the active PiecesOS port number.

You can also find this in the Pieces Desktop App by opening the Settings view and clicking Model Context Protocol (MCP).

Setting Up Goose with Pieces MCP
Follow the steps below to set up Pieces MCP with Goose, either through the command line or desktop application.
Make sure you have the latest version of Goose installed to ensure compatibility with Pieces MCP.
Read the official, open-source documentation on completing these set-up steps.
via CLI
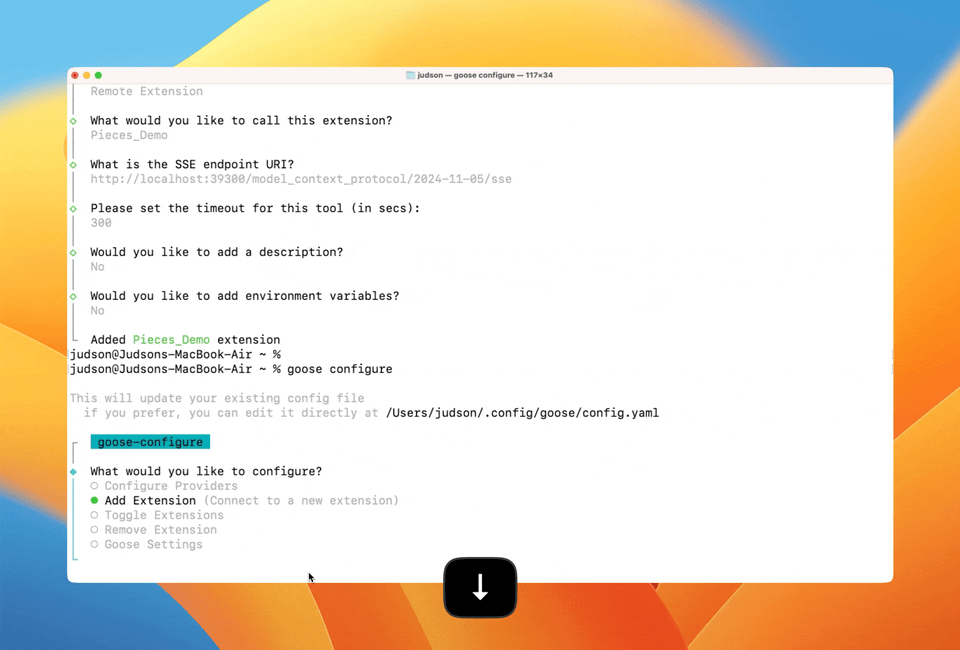
Setting up the Pieces MCP through the Goose Command Line Interface is straightforward.
```bash
goose configure
```
```bash
http://localhost:39300/model_context_protocol/2024-11-05/sse
```

<Callout type="tip">
  Adjust the port number if your local instance of PiecesOS runs on a different one.
</Callout>
Warning: Goose installed, but /Users/you/.local/bin is not in your PATH…
You can fix this issue by adding export PATH=”$HOME/.local/bin:$PATH” to your your ~/.zshrc or ~/.bashrc.
Then, reload with source ~/.zshrc and start a Goose session by using goose from anywhere.
Using Pieces MCP with Goose
Once the integration is set up, you can start using Pieces Long-Term Memory through Goose.
Starting a Conversation
```bash
goose
```

This will open a prompt where you can interact with Goose, which now has access to your Pieces Long-Term Memory.
Try using this prompt:

```plaintext
I need a status update for what I was working on yesterday. Create a report with 5 bullet points based off the most important activities, and give each one a brief description. Use time stamps to accurately report how long I spent working on group of tasks/topics.
```

<Callout type="alert">
  This prompt is formulated for users already familiar with PiecesOS who use the Long-Term Memory Engine.\
  \
  If you are a first-time user, it is recommended that you launch PiecesOS and enable LTM, then allow some time for data capture before using this prompt for a desirable output.
</Callout>

Here’s a response using that exact same prompt inside of Goose using the Pieces MCP integration:

<Image src="https://storage.googleapis.com/hashnode_product_documentation_assets/mcp_documentation/goose_mcp/example_convo_demo_prompt.png" alt="Example Goose conversation demonstrating Pieces MCP" align="center" fullwidth="true" />
Toggling & Removing Pieces MCP
To remove the Pieces MCP for Goose, you can follow the same process you otherwise would for removing any Goose extension.
Then, press `return` (macOS) or `enter` (Windows/Linux) to confirm changes.
Troubleshooting
If you're experiencing issues integrating Pieces MCP with Goose, follow these troubleshooting steps:
Verify PiecesOS Status: Ensure PiecesOS is actively running on your system. MCP integration requires PiecesOS to be operational.
Confirm LTM Engine Activation: Make sure the Long-Term Memory Engine (LTM-2.7) is enabled in PiecesOS, as this engine aggregates context necessary for Goose to retrieve accurate results.
Single MCP Instance: Make sure that you aren't testing multiple instances of the Pieces MCP server in different IDEs. This cross-contamination conflict with the SSE and several MCP instances running on the same port can cause issues in different development environments.
Check MCP Server Status: If you're encountering messages such as "Sorry, I can't do this," your MCP server may not be properly configured or running.
Verify Port Configuration: Double-check the MCP endpoint URL and the port number in your Goose configuration to ensure accuracy. You can find the current SSE endpoint URL in the Pieces Desktop App under Settings → Model Context Protocol (MCP), or in the PiecesOS Quick Menu. It is usually formatted as:
http://localhost:{port_number}/model_context_protocol/{version}/sse
- Mac PATH Issues: If you're having trouble with Goose CLI on macOS, try manually adding it to your PATH:
export PATH="$HOME/.local/bin:$PATH"
Restart Services: If problems persist, try restarting both PiecesOS and Goose, then reconfigure the extension with the current port number.
Use the Correct Mode: You can experience a blockage of LTM data if you are using any other chat mode than Auto mode. Make sure to use
goose configureto change chat modes to avoid issues.
You're now set to enhance your workflow with powerful context retrieval through Pieces MCP integrated seamlessly into Goose. Happy coding!